How to Download Shaders in Minecraft Java Edition (2026 Guide)
Downloading shaders in Minecraft requires Minecraft Java Edition a shader loader such as Iris or OptiFine and a compatible shader pack. Install the loader first place the shader ZIP file in the shaders folder then enable it from Video Settings. The rest of this guide breaks down every step in detail plus how to fix the most common problems players run into.
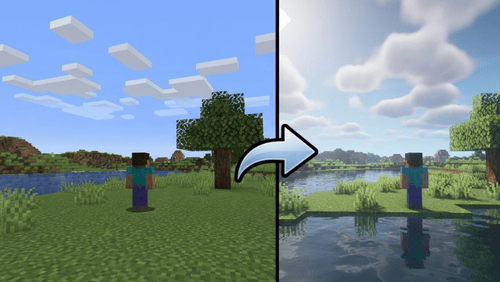
If you’ve ever watched a Minecraft video and wondered why the water looks like glass the sunsets look like paintings, and the shadows actually move with the sun that’s shaders doing the work. Vanilla Minecraft is charming but it was never built to impress on graphics alone. Shaders fix that and once you’ve played with realistic lighting turned on going back to flat vanilla lighting feels like a downgrade.
What Are Minecraft Shaders?
A lot of new players mix up shaders with resource packs but they’re not the same thing. Resource packs swap out the textures used for blocks and items. Shaders don’t touch textures at all they’re a graphics mod that rewrites how the game engine handles light shadows and reflections using shading languages similar to what OpenGL based renderers use in other games.
That means:
- Dynamic shadows that shift with the sun and moon
- Water reflections instead of flat blue tiles
- Volumetric fog better clouds and cinematic skies
- Swaying grass and leaves
- Soft realistic lighting inside caves and buildings
None of this changes gameplay. Redstone, mob spawning and your builds stay exactly the same it’s a pure visual enhancement layered on top of the existing game.
Why Use Shaders in Minecraft?
Beyond looking good on camera shaders genuinely change how the game feels. Building projects look more dramatic at sunset caves feel more atmospheric with proper ambient occlusion and survival nights feel tenser when shadows behave realistically. For anyone recording Minecraft content or just wanting a more immersive world it’s one of the highest impact lowest effort upgrades available.
System Requirements
Shaders lean on your GPU far more than vanilla Minecraft so it’s worth checking your hardware before downloading anything.
Minimum specs for lightweight shaders:
- Minecraft Java Edition installed
- Java Runtime updated to the latest version
- 8GB RAM
- A dedicated graphics card (integrated graphics will struggle)
- Current GPU drivers
Recommended for the heavier packs:
- 16GB RAM
- NVIDIA GTX 1660 / AMD Radeon RX 6600 or better
- Intel Arc GPUs also handle mid-tier shaders reasonably well
- SSD storage (loading shaders off an HDD can cause stutter)
If your setup is on the low end PC side don’t worry several packs below are built specifically for that.
How to Download Shaders in Minecraft
Step 1: Confirm You’re on Java Edition
This trips people up constantly. Shaders only work on Minecraft Java Edition Bedrock Edition (consoles, mobile, Windows Store) uses a completely different rendering system and can’t run these files at all. Open the Minecraft Launcher and confirm your edition before going further.
Step 2: Pick a Shader Loader
Minecraft can’t read shader files by itself you need a loader mod as the middleman.
Iris is the newer community recommended option. It runs better on modern hardware pairs well with the Sodium optimization mod (both are commonly installed through Fabric) and is still actively updated.
OptiFine has been around for years and still has a loyal following thanks to extras like built-in zoom and deep graphics customization. It works fine but tends to lag behind Iris in raw performance especially on newer Minecraft versions.
If you’re starting fresh go with Iris. If you already rely on OptiFine for other mods it’ll still do the job.
Step 3: Download a Compatible Shader Pack
Once your loader is set up grab a shader pack from a trusted source like Modrinth or CurseForge never a random third party site. Make sure the pack version matches your Minecraft version and loader for shader compatibility.
Step 4: Install the Shader Pack
- Download your chosen shader ZIP file don’t extract it.
- Launch Minecraft through the Iris or OptiFine profile not vanilla.
- Go to Options → Video Settings → Shaders.
- Click Shaders Folder to open it on your computer.
- Drop the ZIP file straight into that folder.
- Return to Minecraft and refresh the shader list.
- Select the pack and hit Done.
The game reloads the shaders immediately you’ll usually notice the sky and lighting change first.
Step 5: Fine-Tune Your Settings
Shader packs come with a long list of adjustable options. Getting these right often matters more than which pack you picked. Look for shadow resolution reflection quality, bloom, cloud detail and render distance inside the shader settings menu.
Best Shader Packs for Minecraft
BSL Shaders — A safe, well rounded pick with great sunsets and clean water. Runs on a wide range of hardware making it a solid default choice for improving Minecraft graphics without much tuning.
Complementary Shaders — Popular with survival players for balancing visual enhancement with steady FPS. Strong weather effects and shadow detail.
SEUS (Sonic Ether’s Unbelievable Shaders) — The pack behind most of those cinematic graphics screenshots you see online. Realistic reflections and advanced lighting but demanding on your GPU not ideal for a low end PC.
Sildur’s Vibrant Shaders — Ships in multiple versions from lightweight to high end making it one of the most flexible Java shaders for players with mid range gaming PCs.
During testing on Minecraft Java 1.21 using Iris with Sodium Complementary Shaders delivered the best balance between graphics quality and FPS across a mid range GPU a good reference point if you’re unsure where to start.
Best Settings for Maximum FPS
If performance is dropping after enabling shaders, this combination usually helps with FPS optimization:
| Setting | Recommended |
| Render Distance | 10–12 chunks |
| Simulation Distance | 8 chunks |
| Shadow Quality | Medium |
| Clouds | Fast |
| Water Quality | Medium |
| Bloom | Low |
| Motion Blur | Off |
| Depth of Field | Off |
Scale these up gradually once you confirm your PC handles the baseline smoothly.
Common Shader Problems
Shaders don’t show up at all Usually a version mismatch between the shader pack your Minecraft version or the loader. Re-download the exact matching version.
Game crashes after enabling shaders Almost always outdated GPU drivers or an outdated Java Runtime. Update both before assuming the pack itself is broken.
FPS tanks hard Lower render distance pair Iris with Sodium close background apps or switch to a lighter pack like Sildur’s.
Screen goes black on launch Usually a driver conflict or an unsupported setting. Reset the shader pack’s settings to default or temporarily disable it to confirm the cause.
Are Minecraft Shaders Safe?
Yes, as long as you download from trusted sources like Modrinth CurseForge or the shader creator’s own page. Avoid third party sites promising “premium shaders free” or bundling extra installers that’s where the real risk lives not in the shaders themselves.
Java Edition vs Bedrock Edition
| Feature | Java Edition | Bedrock Edition |
| Shader Support | Full | Very limited |
| Iris / OptiFine | Supported | Not supported |
| Community Shader Packs | Huge library | Small selection |
| Customization Depth | Extensive | Basic |
If graphics quality matters to you, Java is the only version really built for it.
FAQs
Final Thoughts
Now that you know how to download shaders in Minecraft, experiment with different shader packs to find the balance between visual quality and performance that suits your PC. If you’re new to Minecraft customization, explore our other guides on installing mods, installing texture packs, and to get even more out of your game.